𝐇𝐲𝐝𝐫𝐨𝐭𝐞𝐬𝐭 – 𝐀 𝐒𝐭𝐞𝐩-𝐛𝐲-𝐒𝐭𝐞𝐩 𝐆𝐮𝐢𝐝𝐞
Hydrotesting is one of the most critical stages in pressure vessel manufacturing. It ensures the structural integrity and leak-tightness of the vessel before it’s put into service.
𝐁𝐞𝐟𝐨𝐫𝐞 𝐒𝐭𝐚𝐫𝐭𝐢𝐧𝐠 𝐖𝐚𝐭𝐞𝐫 𝐅𝐢𝐥𝐥𝐢𝐧𝐠: 𝐄𝐧𝐬𝐮𝐫𝐞 𝐭𝐡𝐞 𝐅𝐨𝐥𝐥𝐨𝐰𝐢𝐧𝐠
1. Complete all welding on pressure parts.
2. Finish all required NDT and confirm acceptance.
3. Clear all open NCRs/DCRs, if any.
4. Get final clearance of provisionally accepted materials.
5. Ensure PTC/MTC testing is completed with acceptable results.
6. Dimensional checks must be within the acceptable tolerance.
7. Place the vessel on hydrotest saddles in the exact orientation as per approved design drawings.
8. Longitudinal and circumferential weld seams should be visible for inspection.
9. Clean off any primer or paint from pressure weld joints.
10. Check gasket materials and their seating for any damages.
11. Clean the internal surface of the vessel.
12. Ensure proper air venting arrangements are made at required points inside.
13. Assemble all hardware and gaskets as shown in the drawing except those meant only for hydrotest.
14. All fasteners must be torqued properly to specified values.
15. Close all nozzles and openings, except the top one used for water filling.
16. Set up water pressurizing through one of the bottom nozzles.
17. Install square bar arrangements on inlet and outlet connections.
18. Verify direction of water flow using arrows marked on fittings.
19. Ensure two pressure gauges or one gauge and one transducer are available.
20. Pressure gauges must have an upper range that is 1.5 to 4 times the test pressure.
21. Ensure gauges and transducers are calibrated with valid stickers.
22. Verify the PPM level of the test water as per requirement.
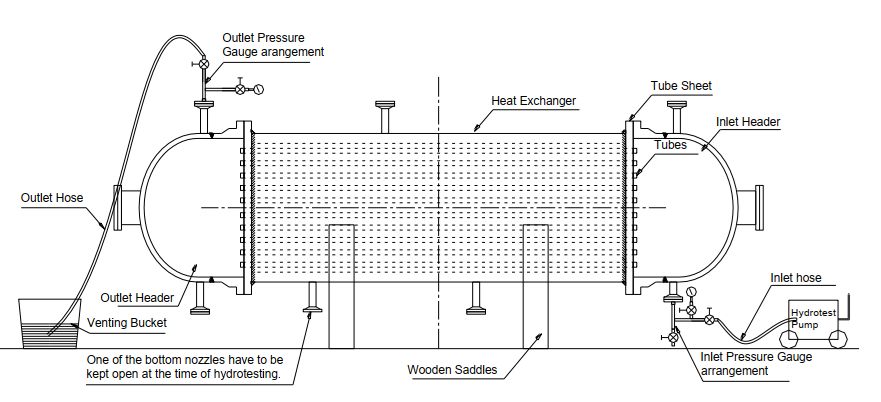
𝐖𝐚𝐭𝐞𝐫 𝐅𝐢𝐥𝐥𝐢𝐧𝐠, 𝐏𝐫𝐞𝐬𝐬𝐮𝐫𝐢𝐳𝐢𝐧𝐠 & 𝐈𝐧𝐬𝐩𝐞𝐜𝐭𝐢𝐨𝐧
1. Fill the vessel with water from the top nozzle and close it with a test blank.
2. The test blank should have a nipple, square bar, pressure gauge, and a venting pipe.
3. Keep the inlet valve closed during initial water filling.
4. After closing the top nozzle, start pumping water from the bottom.
5. Keep the vent pipe dipped in a bucket of water to observe air bubbles.
6. Continue venting until no more air bubbles are seen.
7. Close the top outlet valve and connect the pressure gauge to the line.
8. Isolate the bottom gauge while pumping.
9. Raise pressure to 50% of test pressure.
10. Open the inlet gauge to check pressure readings on both gauges.
11. Increase pressure in 10% increments until full test pressure is reached.
12. Pause for 5 minutes after every 10% increase to monitor pressure behaviour.
13. While pumping, isolate the inlet gauge.
14. Reconnect the gauge when pump is stopped to verify actual pressure.
15. Once test pressure is reached, stop pumping and hold pressure for 30 minutes (or as per spec) and inspect the vessel.